
Set Up An SSL – Background
A Secure Socket Layer (SSL) along with an SSL certificate are both mechanisms that set up the encryption processes allowing the HyperText Transfer Protocol Secure (HTTPS) to run on a website. HTTPS is a security protocol. In use, it allows web browsers/apps to securely connect to a website. With HTTPS, all communication between the browser or web app and a website become encrypted. For e-commerce sites, this encrypted communication has obvious advantages as credit card, and other personal information are provided from the “buyer” to the “seller” to set up an account and exchange funds for the sales transaction. Still, why should someone without prior authorization be able to access or intercept any data, financial or not, going to and from any website? Privacy is important. That being said, it was decided to add HTTPS to LarryTalksTech.
For a site to use HTTPS, you have to:
- Obtain and install an SSL (Secure Socket Layer) certificate on your ISP server
- Configure your website to accept HTTPS
- If you use analytics (Google, Statcounter, etc.), set them up, or reconfigure them, for the new URL, with HTTPS.
The whole undertaking to set up an SSL on your website is not a 5-minute operation. The project will consume several hours and requires both knowledge and planning.
It is not the purpose of this article to layout, step-step-instructions on how to accomplish the aforementioned three steps. Though Step 3 above is fairly straightforward, Step’s 1 and 2 have a number of variables (for example: There are both “free” and “paid” certificates, and different ways to install and maintain each. As well, there are different types of website software, so there are different demands for SSL configuration specific to each type of software. Going a step further, even if you use WordPress, because of plug-ins, CSS coding, etc., there is nearly an infinite possibility for conflicts that might challenge the configuration on WordPress). In short, this isn’t a “cookie-cutter” process.
The purpose of this article is to:
- Provide some different ways of accomplishing setting up an SSL for a website using the same resources used in setting an SSL for LarryTalksTech.
- Share some of the issues and solutions found along the way that helped complete the SSL/HTTPS process for LarryTalksTech.
Set Up An SSL – Resources
In-Depth HTTP to HTTPS Migration Guide for WordPress. Kinsta | Brian Jackson. Click HERE to access this article.
How To Use SSL and HTTPS With WordPress. WPMU DEV. Click HERE to access this article.
Force Your Site To Load Securely With An .htaccess File. DreamHost. Click HERE to access this article.
Set Up An SSL – Issues and Solutions
The SSL Certificate. Getting the SSL Certificate and having it installed was simple. Our ISP was contacted, information about the site and its owners was provided, and a fee of $49 for the certificate was paid. Done. In an hour, the certificate was installed, but……, HTTPS wasn’t working. The following email was received from a Tier 3 tech at my ISP:
“We could see that the https version of the domain loads defaced. We temporarily moved back the plugins folder and could see that the HTTPS version is loading fine after that. I infer that a plugin or more than one plugin is the issue. Please contact your code developer to debug and resolve the issue. Please note that our support is limited when it comes to third-party applications and plugins.…”
So, by moving the plugins folder, all the plugins were “turned off”. With all the plugins “off”, HTTPS worked. OK, good to know, a plugin and/or configuration problem. The rest of the email wasn’t much help.
At the time the SSL certificate was installed, LarryTalksTech used Amazon Web Services’ CloudFront as a Content Delivery Network (CDN). The way LarryTalksTech was configured with CloudFront would require, after some research, a separate SSL certificate to allow HTTPS to communicate the CDN’s cached data (photos and images). Yes, alert readers know that Amazon Web Services (AWS) offers a “free” SSL certificate, but as LarryTalksTech was configured using an Origin-Server (meaning CloudFront cached data directly from the LarryTalksTech server) and not an S3 Bucket (AWS “speak” for storing cached data on one of their cloud servers), the “free” SSL certificate did not apply. CloudFront is partially configured locally through a WordPress caching program called W3 Total Cache. When I deactivated the plugin for W3 Total Cache, which then cut off communication to AWS, HTTPS appeared to be working. Decision time. I could purchase another SSL certificate to use on Amazon Web Services, or simply close the account. I closed the account with Amazon Web Services, which in turn closed the CloudFront CDN. W3 Total Cache was then reconfigured (as a side note, as CloudFront was only caching images and graphics, I decided to give WordPress’s Jetpack CDN a look, as it caches the same formats as ClouldFront. The JetPack CDN is now up and running. It works fine. Not to mention the fact that it is also FREE). At this point, HTTPS began to work……sort of….not all browser and access requests were going to HTTPS, – some were still using HTTP.
Editing Files. In order to get all browser and access requests to use HTTPS, two files on your website’s ISP server need to be edited. This can be done using SSH or FTP. There is also another editing option most people tend to forget: cPanel’s File Manager. It is easy to find. Open the cPanel on your ISP site, and click on File Manager (See Below)

WARNING. Editing requires both care and precision. You must put the right “code” in the right place. Mistakes here can cause many bad things to happen to your website. If you are squeamish about editing files, stop this project now, and get help to complete it. If you are a brave soul and choose to continue, don’t be careless. Make sure you have your site backed up, and make copies of the files you need to change before you change them.
Note: If your website has any security programs installed (such as BulletProof Security), either deactivate them or deactivate the wizards used to protect specific files and folders. The two files you will need to edit (wp-config.php and .htaccess) are usually “secured” by the security programs. Once the files are edited, you can re-activate the appropriate secured files and wizards.
The first file to edit is to the wp-config.php file. The File Manager graphic below shows where to find the file:
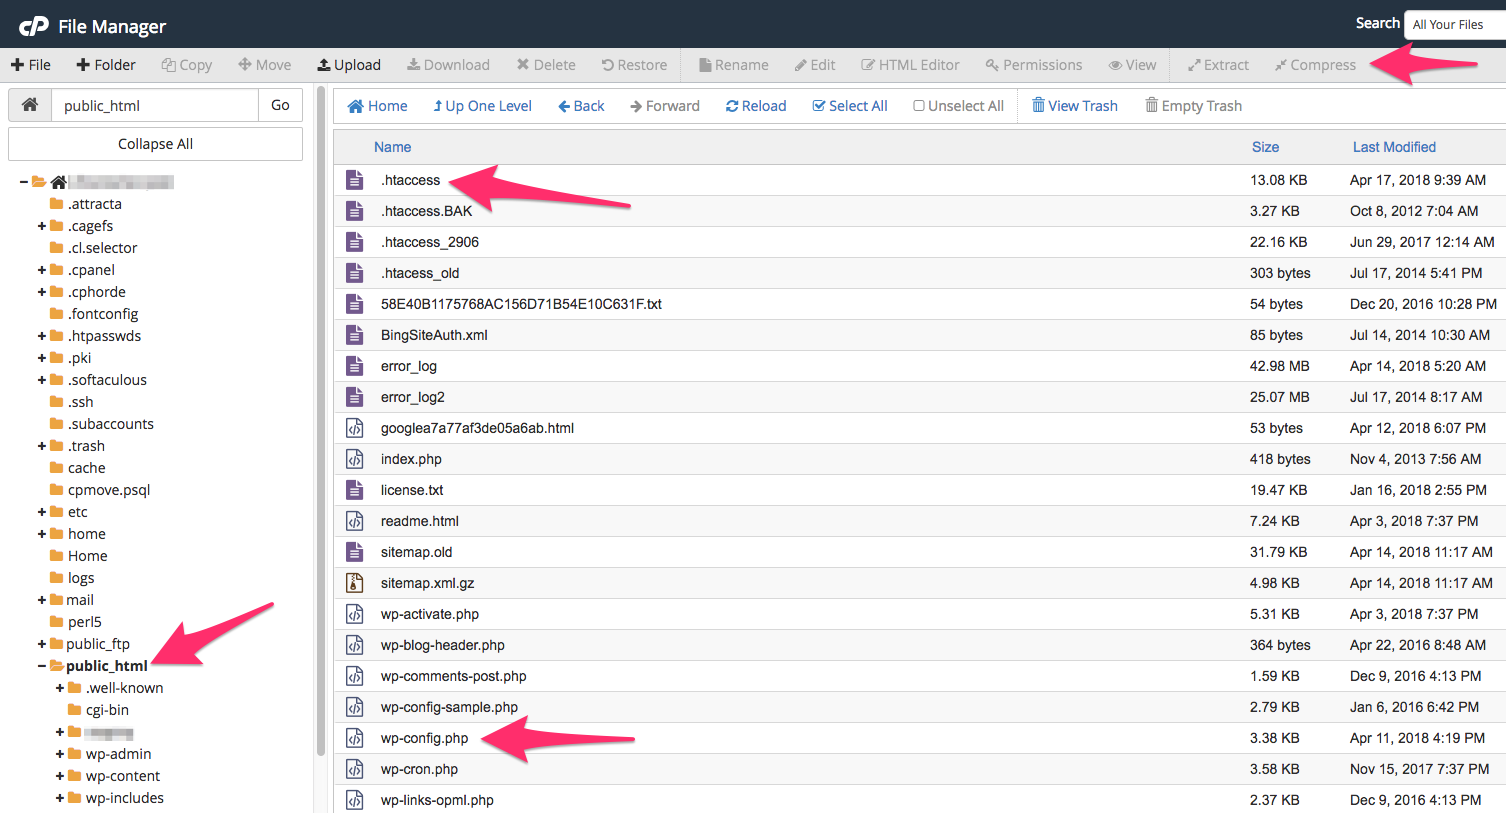
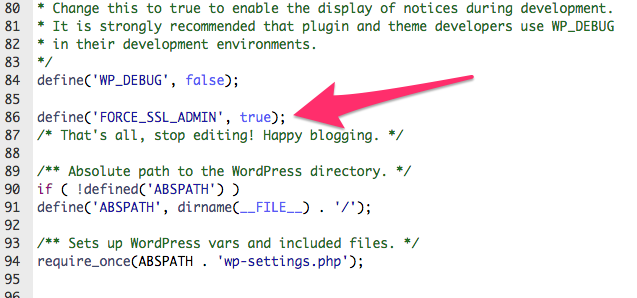
Note: Once you highlight the file to edit, the editing tools become available on the top menu bar. With this edit, we want to force access and logins to the WordPress Admin area using HTTPS. Click the wp-config.php file to highlight it, and then click Edit in the top menu bar. Add the following code snippet:
define(‘FORCE_SSL_ADMIN’, true);
Place the snippet just above the line that says:
/* That’s all, stop editing! Happy blogging. */
Save the file and close the Edit.
When completed your edit will look something like this:
One down, and one to go. Next, we want to create a 301 redirect so all HTTP requests for the website go to HTTPS. Highlight the .htaccess file (to find this file see the File Manager graphic above). Here is the code snippet to insert:
RewriteEngine On
RewriteCond %{HTTPS} !=on
RewriteRule ^(.*)$ https://%{HTTP_HOST}%{REQUEST_URI} [L,R=301]
Place the code snippet before or after (NOT BETWEEN) the following:
# BEGIN WordPress
# END WordPress
Once completed, your .htaccess edit should look similar to this:
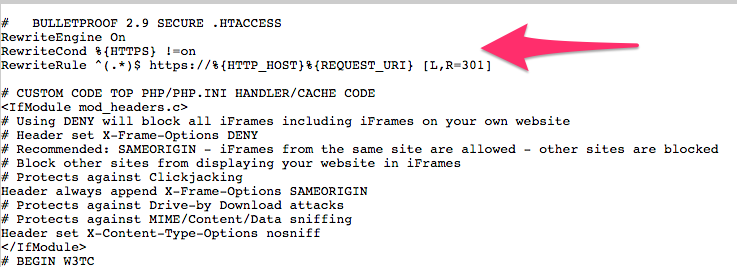
Note: The code snippets used in the two examples above are the exact ones used for the LarryTalksTech SSL install. The articles referenced have different examples of this code.
Set Up An SSL – Some Other Possible Issues
Content Delivery Network. If you have a CDN, most will have a way to integrate with a caching plugin like W3 Total Cache. You may have to check with the plugin developer and/or do some research as to how to do this. It’s usually worth it in terms of improved performance for your site.
Code and Plugins. One of the things that makes WordPress such a great program for your website is the program’s flexibility. WordPress is flexible because its code can be modified manually, or by using plugins for the same purpose. However, anytime you make a change to WordPress’s functions, a problem with code or plugins can become gremlins. Be prepared to do some debugging.
Analytics. If you use Google Analytics, with the addition of SSL to your site, your analytics have probably stopped working. You’ll need to add the new “https” URL to your Search Console and update your tracking code. Also, add a new sitemap. Bing is easy, just add a new sitemap, with the “https” location. With StatCounter, simply change the address to include “https”.