

What Is Murus?
For some time now, IceFloor is the graphic user interface I have used to set up the PF firewalls on both of my Macs (Learn more about IceFloor by clicking HERE). Now that OS X Yosemite has arrived, IceFloor can still be used, but the current version is feature delimited. Though IceFloor is still powerful, and definitely not a shadow of its former self, I thought this might be a good time to see if there was an IceFloor alternative available. I did not have to look any further than the bottom of the Haynet site (home of IceFloor). There, I found that IceFloor’s developer has worked on a new product, available for Yosemite, that performs much of the same work as IceFloor. This new PF GUI, is called Murus. In a few mouse-clicks, I found Murus’s home page, downloaded the program, and installed Murus. Setup is fairly easy, and my PF firewall was up and running in 15 to 20 minutes (You can find the Murus website by clicking HERE).
Here is the developer’s description of Murus:
“Murus Lite is a front-end for the OS X built-in PF network firewall. It’s main purpose is to speed up network firewall configuration and testing, using a simple interface. Filtering and networking options can be set dragging and dropping icons, changing their order, and selecting check boxes. There is no need to learn code syntax or to type strange commands. Everything is managed by visual elements like buttons, collections, graphics, leads. Murus Lite is free for both personal and commercial use.
OS X is one of the most secure computer operating systems today. It features a solid UNIX base and a lot of security features. OS X from the beginning shipped with a pre-installed firewall named IPFW. Directly derived from other less- known operating systems like *BSD, IPFW has been the default OS X firewall from Mac OS X 10.0 to Mac OS X 10.6. Apple started changing it’s firewall policy with Mac OS X 10.5, introducing a built in application firewall, ALF, that can be configured from System Preferences Security preference pane, while IPFW can be configured only using the shell Terminal. On the other hand, Mac OS X Server featured a very simple IPFW graphic frontend.
OS X 10.7 officially introduced a new network firewall, PF, and deprecated the old IPFW. Both PF and IPFW were installed but PF was the preferred choice according to OS X man pages, even if IPFW was the preferred choice for Mac OS X Server 10.7, according to Apple corporate web site. IPFW survived until OS X 10.9, when it’s been removed from OS X 10.10. PF is a much more powerful, elegant network firewall. OS X PF implementation is derived from OpenBSD 4.3 PF, with some tweak made by apple. Most notably, traffic shaping is achieved using the old Dummynet, while ALTQ has totally been left out from OS X PF.
Currently OS X 10.9 and 10.10 features two firewalls:
ALF: application level firewall, can be configured using System Preferences Security prefpane. It allows or blocks network connections at application level.
PF: network firewall, can be configured using the shell terminal or using a third party front-end, like Murus. It allows or blocks network connections at network level, letting you build and customize a complex network infrastructure.
Both firewalls are disabled by default on a freshly installed OS X system.
While ALF is quite easy to enable, and does not require a real configuration, PF does require a deep knowledge of its syntax and logic, and requires the user to manually edit configuration files. Also PF firewall and PF network monitoring has to be done from the command line. The average user really needs a graphic front-end for PF in order to activate network filtering.
Both PF and ALF firewalls can be activated simultaneously, and they will work together. Their approach to network filtering is different, and they follow different logic patterns. The same is true for third party firewalls. Every application firewall can work together with a network firewall. So, for example, the user can run PF network filtering using Murus and application filtering using LittleSnitch in place of ALF.
Murus is NOT a firewall. Murus is a graphic interface for PF. Actually, Murus is much more, because it does a lot more than simple filtering. It lets the user create very complex sets of rules, with advanced options like port knocking, adaptivity, accounting, and much more. The user can monitor network activity, services activity, logs activity in real-time and can interact with connections and rules.
PF ruleset can be managed at three different levels of abstraction: - the most intuitive collection of icons and leds - expanded PF ruleset with each rule coming with descriptive leds and icons, and a detailed textual comment true-real-time PF browser with anchor-path browsing and pf-table listing . The user is able to configure and debug its PF rule-set combining these 3 levels of abstraction simultaneously. The ‘Test’ button is also available, and helps debugging the rule-set without modifying runtime rules. ‘Test’ is able to find errors in PF configuration, and display the rule that generated this error. Murus logic lets the user choose between inclusive and/or exclusive approach to filtering. And this is true at every Murus level: groups, services, logs, accounting, nat. Features like groups interface binding and custom services let the user access a nearly infinite number of PF configurations. All these features are available by simply drag-n-dropping icons. Experienced system administrators will be able to add custom PF rules, and manage mixed rule-sets with both murus-generated and custom rules. Please note that Murus Lite offers only a limited set of features.
Murus installation is safe. Murus does not modify PF system files and does not install any kernel extensions. It makes use of tools and functions already built into OS X.
Here is some info: Murus PF configuration is saved in /etc/murus/ Murus PF boot scripts are stored in:
/Library/LaunchDaemons/it.murus.murusfirewallrules.plist and /etc/murus.sh Murus library is stored in /Library/Preferences/it.murus.muruslibrary.plist Murus user preferences are stored in
~/Library/Preferences/it.murus.Murus.plist Murus adds an entry to both /etc/syslog.conf and /etc/newsyslog.conf in order to activate PF logging and log file rotation[1] ”
Murus Setup
It is well beyond the scope of this article to discuss all the possible configuration variables in Murus, for to do so would create a rather lengthy Tolstoy-ish document. That being the case, we will delve into some simple and common setup alternatives. Note, before going further: By default, lets assume that the Mac’s AF firewall is “ON” and configured, with all “Outbound” ports open in Murus, and except for “Basic Services” (Essential system services, ie: DNS, MDNS, NTP, DHCP, and LDAP), all “Inbound Ports” are closed.
The simplest way to configure Murus is click on the “Presets” label in the tool-bar, and in the newly opened window, adjust the Slider, by moving it left or right, till you find a suitable setting, based on how you use your computer (See Figure 1. below). Each setting on the Slider, has a synopsis provided below the Slider. When you find the setting you like, click the “Activate selected Murus preset and start PF” button at the bottom of the window. You will then see a text box asking if you will allow scripts to be installed to start the configured PF firewall when your computer boots up. This will be a “Yes” response. To be safe, on the upper-most tool bar, click “Firewall”, then “Save Configuration”.

Here is a second way to configure Murus. When you first open the program, you will see a window with a sidebar on the left, and one large pane on the right (See Figure 2). If you click the “Inbound” label in the tool bar directly above the big pane, you probably see a very lonely icon called “Basic Services”. It the sidebar, you will see all the available services. Simply put, these services are graphical representations of port numbers. Each service has a port number, or numbers, assigned to it. When you drag a service from the side bar into the large pane, you are opening up that port or ports associated with the service. Your job now is to decide what services you want to use, and drag them to the large pane. Should you find that you have added a service by accident, simply highlight the offending icon, click the “x” you see on the left side of the highlighted area, and delete it (Note: the icon still remains in the services sidebar). When you are done, click the “Test” label at the right of toolbar above, and take your configuration for a spin. At this point, if you are happy with how everything is working, depress the “Stop” label next to “Test”. Next, save the configuration (as mentioned above), and click on the “Start” label. This will start the updating of scripts in the startup files, and activate your firewall with the new settings.

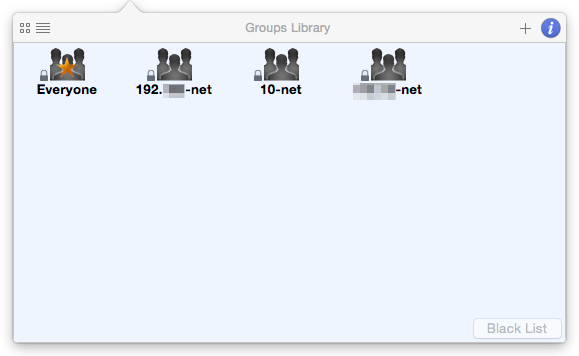
But wait……there’s more. You can create groups (like a person, or IP addresses, etc.) and either allow or block the groups from access to the service ports you opened in the “Large Pane”. First, lets take a look at the Groups, by clicking the label of the same name at the left side of the most immediate tool bar (see Figure 3). This example displays the default, as in setup by Murus, settings for your computer. Assuming your computer is on a local netowrk, you will see a public IP (192.XXX.net) and two private IP’s (10-net and 17-net). Finally, a group is created for Everyone (carte blanche access). In addition, you can create a group for a User, say…..Fred. In the Group Window, click the “+” in the upper right hand corner. Name your group Fred, and use supply the IP Address for Fred.
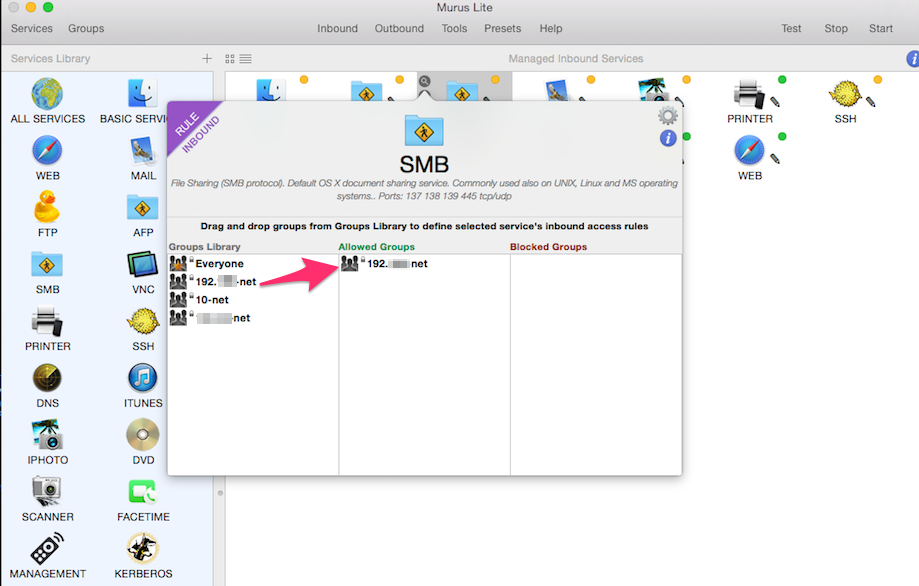
Now, highlight an icon in the “Large Pane”, and click the magnifying glass in the upper left corner of the highlight, you will see displayed a window like Figure 4, below. In this example, Group “192.XXX-net” can access the computer using the open SMB port. Say that you do not wish Fred to access your computer via your SMB port, just drag the “Fred” icon the Blocked Groups column……sorry, Fred.
In Conclusion
There you have it, some samples of what Murus can do. It can do much more, and it can tell you a lot about what it is doing. Try the program and do some experimentation.
Finally, it is important to remember that Murus is still in Beta form. The graphics and instructions given here are from Beta 2. As the program matures, you will likely see changes to many of the program’s features. Finally, like IceFloor for Yosemite, Murus is feature limited as well. Still, Murus is a very credible IceFloor alternative. In the end, even with their limited feature sets, both programs offer as excellent way to engage the Mac’s built-in PF firewall, and configure it to meet the needs of even the most demanding of users. It would be a mistake not to use one of these programs to help protect your computer and its data, – Murus and IceFloor are that good.
Sources
1. Murus Lite Quick Start Guide | Murus
Murus | murusfirewall.com
iMac Mockup Stock Photo | spliteshire.com