Introduction
Several months ago, I set up a modest home surveillance system. To accomplish this, I could have bought a complete surveillance system from Walmart, Amazon, etc., but I felt I could piece together a system that would be more durable, efficient, and economical than the store-bought systems. I have used some of these ready-made systems in commercial settings, and have found video quality lacking, the software limited in options, and the hard drives used for storage questionable. Let’s face it, at the end of the day, a security device needs to be usable and reliable.
The home surveillance system I built and installed, as discussed in this article, uses the following components:
2 REOLINK 4MP (2560×1440) Super HD PoE Camera System Outdoor Video Surveillance Home IP Security IR Night Vision Motion Detection Bullet Cameras with Audio Support. Model: RLC-410
1 TP-Link TL-SG1005P 5-Port Gigabit Ethernet PoE Desktop Switch with 4-PoE Ports, 55W
2 25 foot Cat 6 Ethernet Cables
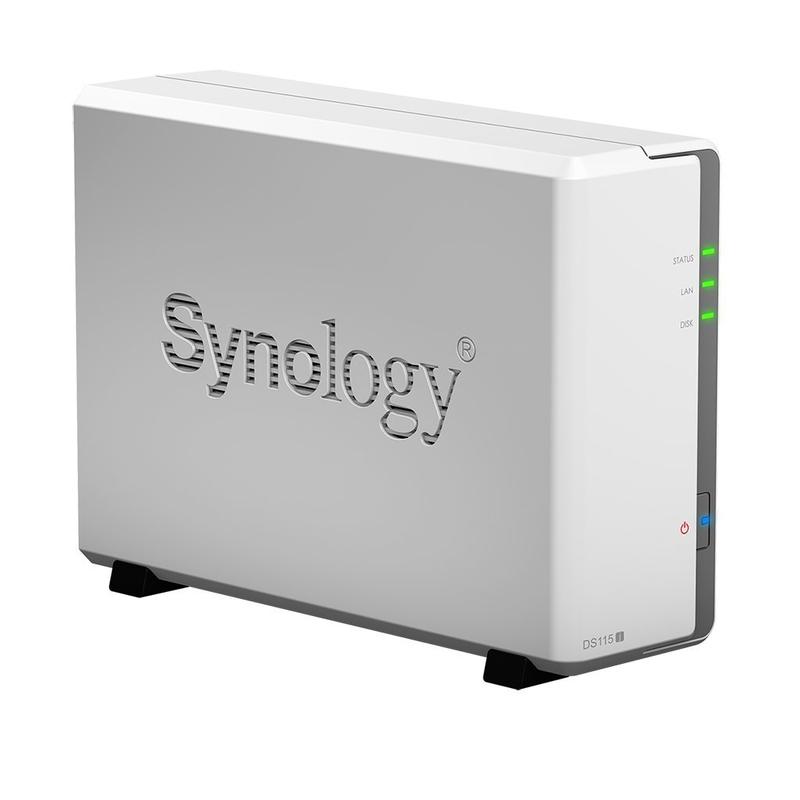
1 Synology DS115j Diskless Network Attached Storage (NAS) unit
1 HGST Ultrastar 7K4000 4TB 7200RPM 64MB Cache SATA 6.0Gb/s 3.5″ Enterprise Hard Drive
For software to manage the cameras and their data, Synology’s Surveillance Station software is used. It comes free with the DS115j, as is the license for two cameras.
This article is intended to give you some questions to answer early in the process to help you assemble a system that best meets your needs, insight into the hardware that is used, and three excellent videos on how to configure Surveillance Station.
Some Questions You Need To Consider To Setup A Home Surveillance System:
To best decide on the type of cameras needed for your home surveillance system, you need to know how you are planning to use them.
◆ What do you want to monitor? Access points to your home, an open area (like a yard), a room, a child or pet?
◆ Where do you plan to install your cameras for monitoring?
◆ Do you want the cameras visible or concealed? Visible cameras can be a theft or vandalism deterrent. Concealing cameras might well get you into trouble….be careful here.
◆ How much area will the camera be covering? Know the visual range of the camera you are installing.
◆ Do you want or need a camera with night-vision? If you do, what is the range you need for effective night-vision? Most inexpensive cameras advertise roughly night vision for 60 feet. In most cases, this is optimistic, especially if clarity is important to you. The Reolink cameras I use have a night vision range of 100 feet.
◆ How do you plan to get the images to your computer network? Typical options are:
◆ WiFi – the camera will be WiFi enabled and it simply needs to be joined to your existing network. Camera data can be stored on a NAS, or Computer.
◆ Ethernet – an Ethernet cable will need to be run from a switch to the camera. OEM camera software or Surveillance Station will be needed to configure the camera to join your wired network. Data can be stored on a NAS, or Computer. This is how I store my data.
◆ SDHC memory card – These can either be non-removable, or removable. The former will need a means to download the information from the camera, and the later will need a computer from which the data from the card can be stored. Both options will need routine monitoring for each camera, making this option hard to become a workable data storage solution. Also, if you plan to use high-definition cameras, consider the need for a lot of space for storage. Hi-Def files can be BIG.
◆ How do you plan to power your cameras?
◆ From camera to electrical outlet
◆ Power over Ethernet (POE). Here, an Ethernet cable is used to provide both data transfer and power. Typically, the camera is purchased as being POE enabled and is connected via an Ethernet cable to a POE enabled switch. This switch is then connected to a router or a non-POE (meaning a regular or normal) network switch. POE is the method I chose for my cameras.
◆ Battery – like the SDHC card above, this option requires regular maintenance (because of this, an option I would not recommend).
◆ If the camera is being used “outside”, is it designed to work in your climate?
Product Overview
Here is some further detail on the hardware used in my home surveillance system:
The NAS
For our home surveillance system, the Synology D115j is best described as a mini file server. It does not have an abundance of power, but it compensates for that by being efficient and not being pricey at just over $100 (US). The operating system is a very well tweaked (by Synology) version of Linux. Here are the D115J’s specs:
1-bay NAS drive
Synology DSM 5.1 operating system
800 MHz Marvell ARMADA 370 88F6707 single-core (ARM)
256 MB DDR3 RAM
mounting for 1x 3.5-inch SATA Revision 3 HDD (up to 12 TB)
1x gigabit ethernet
2x USB 2.0
1x 55 mm cooling fan
36 W external power supply
71 x 161 x 224 mm
For more specs, click HERE
The Software
Surveillance Station is software that comes with every Synology (NAS). Surveillance Station turns the D115j into a powerful security device archiving feeds from your security cameras. From Synology, here are some of Surveillance Station’s features:
Motion Detection: Set up your cameras to start recording when motion is detected and catch what you need without having to sift through unnecessary footage. With alerts, you will be notified any time there is movement, an object has gone missing, or the camera view is blocked, making sure you never skip a beat!
Scheduled Recording: For days when you plan on being home and don’t need to set up motion detection, surveillance station makes it simple to schedule and customize when and how you want to record without having to manually adjust the recording settings every time. Simple, yet secure!
Easy Management: Tailor and streamline your real-time monitoring window! Now you can arrange your layout just the way you like it. With easy drag-and-drop functionality, simple camera installation, greater integration, and our intuitive software, managing your home surveillance is a breeze!
Start Streaming Where Ever You Are: Monitor your home while on the go with DS cam, our mobile surveillance app, which is available on iOS and Android devices. Here you can view live recordings, adjust your camera angle and zoom, all with on-screen tools for enhanced functionality.
Notifications and Alerts: Stay notified of any suspicious activity with custom triggers sent via SMS, e-mail, and push notifications. Choose the notification method that works best for you and enjoy peace of mind knowing you will always be the first to hear if there’s any questionable activity in your home.
Surveillance Station can show you live feeds from your cameras, as well as your archived feeds.
Surveillance Station is powerful. The software that came with the Reolink offered nowhere near the versatility of Surveillance Station.
Note: Besides Surveillance Station, the DS115j NAS comes with a number of free software options letting the NAS become a media server, file server, personal cloud, and more. Because the DS115j has very small processor, and limited memory, this NAS is definitely a one-trick-pony. If you want to use the DS115j for your surveillance system, then don’t try to make the box do any other functions.
The Cameras
Reolink RLC-410 4MP HD PoE Bullet IP Security Camera
Reolink RLC-410 is packed with 4MP HD camera, supporting 80 ˚wide viewing angle, 100 ft night vision range, built-in microphone, motion detection and motion alerts. Outfitted with a waterproof housing, RLC-410 is solid for outdoor and indoor use, such as front door, backyard, driveway, garage security. It’s powered over Ethernet cable, easy connection, and installation, suitable for DIY.
- Camera Specifications
- Video Quality: 4 Megapixel (2560 x 1440)
- Lens: f= 4.0 mm, F=2.0; Viewing Angle: 80°
- SD card: No
- Microphone: Yes (Audio Range up to 15ft)
- Operating Power: POE or 12V DC (Power Adapter not Included)
- Night Vision: 65-100ft (depends on the Environment)
- Frame Rate: Up to 30fps
- POE Standard: 802.3af, 44V~54V. Support up to 330ft via CAT6 cable
- Network Connection: P2P and QR Code
- PC OS: Windows, Mac OS
- Mobile OS: iOS, Android
- Browser: Supports IE Edge, Chrome, Firefox, Safari
- ONVIF support list: Digital WatchDog, Blue Iris, iSpy, Video Sighthound, Security Spy, Synology, QNap

The PoE Switch
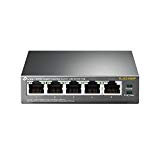
TP-Link TL-SG1005P 5-Port Gigabit Ethernet PoE Desktop Switch:
- 5 10/100/1000Mbps RJ45 ports
- With four PoE ports, transfers data and power on one single cable
- Working with IEEE 802.3af compliant PDs, expands home and office network
- 802.1p/DSCP QoS enable smooth latency-sensitive traffic
- Supports PoE Power up to 15.4W for each PoE port
- Supports PoE Power up to 56W for all PoE ports
- Requires no configuration and installation
To learn more about PoE technology, click HERE.
Basically, that box sends both data and power to your cameras. The last port, on the right (as you face the box) connects via Ethernet patch cable to either another regular Ethernet switch or to your router. In addition, the box plugs into your power supply. Finally, plug the Ethernet cables from your cameras into the Ethernet switch, and your cameras are connected like any other Ethernet device, and each camera has their own URL.
The Hard Drive
The HGST Ultrastar 7K4000 4TB 7200RPM 64MB Cache SATA 6.0Gb/s 3.5″ Enterprise Hard Drive is one tough (I hope) drive. Here are some spec’s:
HGST Ultrastar 7K4000 Enterprise Hard Drive is the world’s first 4TB 7200 RPM hard drive with a 2.0 million hours MTBF specification, originally offered with SATA 6Gb/s. Ultrastar 7K4000 represents the sixth-generation HGST 5-platter design, which has been field proven by top server and storage OEMs and Internet giants. Engineered for the highest quality, the Ultrastar 7K4000 is put through grueling design tests during development and must pass stringent ongoing reliability testing during manufacturing. Ultrastar 7K4000 delivers by reducing downtime, eliminating service calls and minimizing TCO.
Combining 7200 RPM performance and granular power control and operating at 7200 RPM, the Hitachi Ultrastar 7K4000 offers better overall performance than slower-RPM, capacity-oriented drives at impressively low power consumption rates. When compared to the previous generation Ultrastar 7K3000, the 7K4000 offers up to a 155% improvement in sustained data transfer rate and a 120% improvement in watts-per-GB. With five Advanced Power Management modes, a 36% reduction in watts during low-RPM idle mode, and using less than 1W during standby/sleep mode, the Ultrastar 7K4000 can help data centers achieve lower AC power and HVAC requirements, freeing up precious headroom
Enhancing data safety and security to ensure the utmost in data safety and security, the Ultrastar 7K4000 is also available with a bulk data encryption (BDE) option. When enabled, the Hitachi BDE implementation encrypts all data on the drive using a private security key as it is written to the disk and then decrypts it with the key as it is retrieved.
Note: There are many different types of hard drives designed specifically for different needs. I chose an enterprise-grade hard drive because it will be on 24/7/365 and will be written and read through most if not all of its cycles. To help you find the hard drive for your needs, please read an article I recently wrote that goes into each “type” of a hard drive by clicking HERE.
Setting Up Surveillance Station
Some pointers:
Before you physically install your system, hook it up and test it to see if all the pieces are playing together nicely. The Reolink supplied software was installed on one of my computers, and with everything plugged in I verified that “live” video was working.
Before you shut everything down from your test, make sure you know the IP address for each of your cameras and your NAS box. Each of these devices are critical, and your surveillance software needs to always be able to find each device, and that means you need to give each device a static IP address. To do this, you need to know the device’s current IP address, and its MAC address (usually printed on the device itself and/or the box it came in). The IP address can be had usually by the camera software, or if needed, from a terminal command (like “arp -a” on a MAC, which shows all addresses on your segment). Once you have the IP and MAC addresses for each device (camera and NAS box), go to your router, and open it’s setup functions by entering the router’s IP address into the browser’s address area. Once the setup screen appears, you will be prompted for a username and password. Enter this information (if you don’t know it, it is often printed on the router itself, or it can be found in the router’s manual). From this point router’s vary. You will be looking for a tab that shows current DHCP settings (the router’s automatic allocation of IP addresses to devices). Typically, near this area is a tab where you can enter a “static” IP address. The router will want each device’s IP address and MAC address. Once you save this page, unless you manually change the address yourself, the address you enter (which should be its current address), will always be the same.
Now to the videos. These are from LON.TV, and are sponsored by Synology. In a word, they are excellent. I used them when I set up my home surveillance system on my Synology NAS. These videos will help you configure and use an amazing piece of software: Surveillance Station.
Summary:
The Synology DS115j and the HGST 4TB hard drive together cost $200. Together, both cameras cost $118. Both of the Cat 6 cables cost $25. The TP Link PoE port cost $40. Surveillance Station comes free with a license for 2 cameras when you buy a Synology NAS. For a total of $383, to me, this is a pretty sophisticated system.
The piece of the setup that took the most time, was configuring the “motion detection”. I let Surveillance Station manage the motion detection. There are just too many variables for a “one size fits all” solution. The best way to find a solution is trial and error. I fumbled with the settings off and on for a week or so, once they were dialed in, everything has worked fine.
Note: My cameras run 24/7. Videos are saved every 30 minutes. They are set at 1080P, at 20 fps. I receive emails when a camera detects motion, are unplugged, or the server is tampered with. Should there be an unauthorized entry into my home, the email serves as a place-setting for the 30-minute file that would display the entire event. I give the cameras plenty of storage, 1 TB each.